Install Yosemite,
if you haven't already done so, then check out these 21 must-know tips,
tricks, and features to become a master of Mac OS X 10.10.
#1. Answer & Make Phone Calls
If
you have an iPhone (5 or later), you can now make and receive phone
calls on your Mac computer. You just need to make sure you're on the
same Wi-Fi network and are using the same iCloud account on both
devices.
When you're in the Messages app, go to Preferences ->
Accounts and make sure your number is checked, which it more than likely
is. Now, anytime you receive a phone call, you'll get a notification at
the top right of your computer screen where you can choose to accept or
decline it.
To
make a call, go to FaceTime and either enter the number you want to
call or hit the phone icon next to a recent number under the Audio tab.
Note:
In addition to Yosemite, Wi-Fi calling via iPhone also works on the
iPad Air, iPad mini, and iPad mini with Retina display.
#2. Receive & Send SMS Text Messages
While
you've been able to send iMessages to other iOS users directly from
your computer, regular text messages were still relegated to your
iPhone. Now, thanks to SMS Relay, you can send text messages directly
from the Messages app on your Mac.
Just make sure to follow the instructions in Neil's iOS 8.1 guide to get started.
#3. Share Screen & Mute Notifications
Also
new in the Messages app for Mac is the ability to share your screen
with another person. Just click on Details in the conversation thread
and choose either "Invite to share my screen" or "Ask to share screen"
from the share screen option.
You can also mute notifications by checking the mark next to "Do Not Disturb," just like on iOS 8.
#4. Send Voice Messages
If the person you're communicating with in the Messages app has iMessage as well, you can send them voice messages, just like on iOS 8. Click on the microphone icon at the bottom right of the Messages window to begin recording.
#5. Enhanced Spotlight Search
Instead
of just searching through the apps on your computer, Spotlight search
now shows results from iTunes, Wikipedia, suggested websites, your
emails, and more. Either click on the Spotlight icon in the top right of
the menu bar, or just use the Command+Spacebar shortcut, to start a
search.
When
typing in "Death Grips," an experimental hip-hop group, I was able to
pull up music on my computer (and on iCloud), songs and albums available
for purchase in iTunes, their official website and Wikipedia page, and
even some text messages sent to friends in which the band was mentioned.
#6. Use Spotlight as a Calculator & Currency Converter
Spotlight
also moonlights as a basic calculator and a currency converter. For
instant calculations, use numbers and mathematical symbols in Spotlight
(there's no need to hit enter or anything).
Enter
the dollar sign ($) first (or any other currency symbol) and then the
amount you want to convert to see the conversions for various popular
currencies from around the world.
#7. Predictive Text
While it's not exactly the predictive text you're accustomed to
on your iPad, iPhone, or iPod touch, Yosemite does have a hidden
feature that brings up word suggestions when you're typing up a
sentence.
Press Esc after typing a word and a list of suggestions will appear.
As
of now, the feature only seems to be working with TextEdit (and in a
few other Apple apps, like Messages, with limited functionality), but
once it rolls out to other apps (hopefully Safari and Pages), it will
become extremely useful.
#8. Widgets in Your Notification Center
Just like on iOS 8,
you can now add widgets to the Notification Center on your computer.
Some of the currently compatible third-party apps include Wunderlist (pictured below), 1Password, and Pocket. Stock widgets include Weather, Stocks, Calendar, Reminders, Social, World Clock, and Calculator.
Add
a widget by opening the Notification Center (the list-looking icon in
the top right of the menu bar, next to the Spotlight icon), clicking on
"Edit" at the bottom, then adding each widget manually by clicking on
the green plus sign (+) next to it. To remove one, use the red minus
sign (-).
#9. Dark Menu Bar & Dock
A little
easier on the eyes, Yosemite now has a dark mode that's helpful when
you're using your computer at night. Head over to System Preferences
-> General and check the box next to "Use dark menu bar and Dock."
Your menu bar and dock will now turn black and dark grey.
[1] Regular mode, [2] Dark mode
Since there's no keyboard shortcut by default for this action, Redditor abspam3 (via Lifehacker) figured out how to make one with Terminal. just open up Terminal and type in the following command, followed by the Enter key.
Enter
in your password, then log out and back in again, and use the keyboard
shortcut Control+Option+Command+T to switch between regular and dark
mode.
#10. Use Shift Key to Move Dock
Speaking
of the Dock, if you want to reposition it on your screen without going
into System Preferences, hover over the Dock's divider on the far right
until your cursor turns into a two sided arrow. Then, hold down the
Shift key and drag it where you want.
#11. Find Yosemite's Hidden Maximize Button
The
full-screen button usually located in the top-right corner of an app
has been replaced by the green maximize button that sits next to the
close and minimize buttons on the other side of the window.
So
what happened to the green maximize button? Well, it's actually still
there. Hold down on the Option key and hover over the new green
full-screen button; you'll see it turn into the old maximize button.
Note
that if you're in iTunes and hold down the Option key, the Genius
Shuffle option will appear where the back button usually is.
#12. Enable Finder's Preview Pane
Are
your Finder windows looking a little plain? For some users, Yosemite
hid some features like Preview. If you want the Preview pane back, go to
View in the menu bar and click on Show Preview.
#13. Annotate Attachments in Mail
Through
the Mail app on Yosemite, you can now annotate attachments such as
pictures, PDFs, documents, and more. All you have to do is attach a
file, click on it, then select Markup.
You can draw, add text and shapes, leave a signature, and more on your attachment, all directly through the Mail app.
#14. Use Your TrackPad to Pen Signatures
While
you've previously been able to scan signatures using the iSight camera
on your Mac, Yosemite has a new feature where you can use the trackpad
on your MacBook to digitally sign your signature.
Open Preview,
click on Markup, and use the signature icon to begin signing with your
finger. This also works through the Markup feature in Mail.
#15. Use DuckDuckGo for Private Browsing in Safari
DuckDuckGo is a web browser known for its privacy features, which allows users to surf the web without having their searches saved or their information shared with advertisers.
To
set DuckDuckGo as your default search engine in Safari, select Safari
in the menu bar and click on Preferences -> Search, then select
DuckDuckGo under the "Search engine" option.
#16. View Stacked Tabs in Safari
Through
the new "Show all tabs" icon at the top-right corner of Safari, you'll
be able to view your tabs in a more organized manner. If you have
several tabs open from the same website, or from Private Browsing, they
will show up stacked on top of each other.
Along
the bottom, you'll see any tabs you have open on your iPhone or other
iOS device, which is similar to how it works on iOS devices, where your
Mac tabs show up underneath iOS tabs.
#17. Close iOS Safari Tabs
As
mentioned above, all of the open tabs on your iOS device will appear in
Safari on your Mac. In case you want to close some of the tabs on your
iPhone, you can do so directly from your computer by hovering over the
tab and tapping the X on the far right.
#18. Bring Back Safari Toolbar Features
Safari
has received a minimalist redesign and many of the features that you're
accustomed to may not be where you remember. Follow these steps to
regain some of the missing or misplaced stuff.
Full URL: Preferences -> Advanced -> Show Full Website Address
Bookmarks: View -> Show Favorites Bar
Tabs: View -> Show Tab Bar
Status Bar: View -> Show Status Bar
Menu Bar Tools: View -> Customize Toolbar -> Drag icons you want to restore
Your Safari will go from looking like this...
To this...
#19. Record Your iOS Screen
Connect
your iOS device to your computer via a Lightning cable and you can
easily record its screen by opening QuickTime, going to File -> New
Screen Recording, then selecting your device from the list of choices.
If
you've used QuickTime to record your computer's screen before, it's the
same process: click the red button to record and the stop button in the
menu bar to finish.
#20. Take a 3D Tour of Your Favorite City
Enter
a popular city name in the Maps app in Yosemite and you can take a 3D
tour that flies you over the city, showing you the sites. Just tap on
Start next to the "3D Flyover Tour" box that appears at the bottom. New
York, Paris, Tokyo, and London are just a few of the cities that
currently work with the feature.
#21. Quickly Connect to Hotspot
If your device (with cellular data) is running iOS 8.1, you can use the Personal Hotspot feature
to connect it to your Mac, where you can then use it as an available
network, as well as view battery life and connection strength.
Of course, you have to have a hotspot feature in the plan with your carrier in order for this to work. Click here for more info.
Final Thoughts?
Got any features to
add that you enjoy on Mac OS X Yosemite? Anything you hate? Lets us know
in the comments below, or hit us up on Facebook or Twitter
The keyboard shortcuts helps you to get the work done faster with less effort. Normally you know the general keyboard shortcuts, like cut, copy, paste, undo etc. If you work more with windows then this keyboard shortcuts are helpful for you, also by using this shortcuts you can do your job very faster.
With little practice you will be master in these shortcuts like copy
and paste shortcuts. If your daily job is with windows then you can try
this 20 keyboard shortcuts for getting work done faster.
20 Keyboard Shortcuts That Make You Faster
Ctrl+C (Copy)
Ctrl+X (Cut)
Ctrl+V (Paste)
Ctrl+Z (Undo)
Ctrl+Y (Redo)
Ctrl+A (Select all)
Alt+Enter or Alt+ Double Click on Any Icon (View the properties of selected item or any folder)
Alt+Tab (Switch between many open items)
F2 key (Rename selected item)
Ctrl+Shift+Esc (Open Task Manager)
Ctrl+Tab (Move forward the tabs)→This Shortcut helps you in
browsers, you can move tabs forward if you open many tabs in browsers.
Ctrl+Shift+Tab (Move backward the tabs)→This is reverse process of Ctrl+Tab
Ctrl+F (Start the Find utility)
Ctrl+Shift with any arrow key (Highlight a text or item)
Windows Logo+D (Display the desktop)
Windows Logo+M (Minimize all the windows)
Windows Logo+E (Open My Computer)
Windows Logo+ L (Lock the computer)
Windows Logo+R (Open the Run dialog box)
Windows Logo+U (Open Utility Manager)
if you find this information useful likes us on facebook
There are several components within a computer that
help make it faster and more powerful. Below is a list of all the
hardware components that help contribute to the performance of a
computer. Keep in mind that even the software running on the computer
may impact the speed of a computer.
Processor (CPU)
The overall speed or clock speed of the computer and how fast it is capable of processing data is managed by the computer processor (CPU).
The computer will be much faster and more powerful when it is capable
of executing more instructions every second. For example, the first
computer processor was the Intel 4004, which was only a 740 kHz processor and capable of processing approximately 92,000 instructions per second. Today's processors are multi-coreGHz processors capable of processing over 100 billion instructions per second.
Cache
Although today's computers are cable of executing
billions of instructions every second, the processor is usually waiting
for those instructions from the slower types of memory in the computer.
Because the RAM and hard disk drive are much slower than the CPU,
computer processors and motherboards use cache
to transfer instructions between the processor, memory, and components
in the computer. Cache is the fastest type of memory and a computer with
more L2 cache or L3 cache will be capable of storing more instructions and send those instructions to the processor more efficiently.
Memory (RAM)
A computer with more memory (RAM)
will be capable of storing more programs that are currently running in
memory. If your computer runs out of memory, the computer must swap
unused data stored in memory to your hard disk drive until it is needed
again. This makes each task more complex by adding another extra step
and because the hard drive is the slowest type of memory in the computer
it will decrease the speed even more.
BUS speed
The bus speed of the motherboard can make the data being transferred between all the components much faster or slower. For example, a Front Side Bus (FSB)
of 66 MHz is going to be much slower than a 400 MHz FSB. If the bus is
slow, it only increases the amount of time the processors has to wait
for the instructions.
Hard drive
There
are several contributing parts of a hard disk drive that can make it
faster, which makes your overall computer faster. With an old or slow
hard disk drive each time your computer has to read or write to the hard
disk drive the system will slow down. Below is a list of different
factors
An SSD drive has no movable parts which makes it much faster than a traditional HDD.
Older computers use EIDE (ATA) cables to connect the drives, which has a much slower transfer rate than the SATA included with newer computers.
With an HDD the RPM is how fast the platters in a hard drive spin. A 5400 RPM hard disk drive will be a lot slower than a 7200 RPM drive.
Since
Cache is the fastest type of memory, a hard drive with a cache or
larger cache allows data to be handled more efficiently when it's
transferred between the computer and drive.
Video card
If you play the latest computer games, a powerful video card with its own CPU (GPU)
and its own memory makes the game run faster. These types of video
cards help with the performance of the computer by taking on the
responsibilities of processing the 3D rendering and other complex tasks.
The interface of a video card is also a contributing factor to the performance of the video card. For example, the older AGP video cards are much slower than the new PCI Express video cards.
Step 1: Identify Objects That Can Be Used as Laptop Legs
The
objects can be anything from bottle caps to small card boxes or even
paper. You need at least 3 or 4 of them, but 4 is better. Use your
imagination or just look around. You can always find something if you
look around.
Step 2: Place the Objects Under Your Laptop
Placing
four small objects under the laptop at the edges often is enough to
make sure airflow can pass without problems. If you feel that the
machine is not stable enough when typing, try other objects or five
legs.
Step 3: Check to Make Sure the Machine Is Stable
We
don't want to break our machine, right? We try to cool it down so it
will work longer, without the risk of getting fried or melted from high
temperatures. Play on the keyboard for some minutes, either typing fast
or playing games. If you feel it's unstable, return to Step 2 or even
Step 1.
Step 4: Enjoy Your Cooled Down Machine
The
objects you used are still there, you can return them if you find better
legs. Your machine is less noisy, less hotter and sometimes it looks
cooler. This technique can be used at home, at the office, and pretty
much every place where you have a stable surface to place your machine.
Shortcut keys help provide an easier and
usually quicker method of navigating and using computer software
programs. Shortcut keys are commonly accessed by using the Alt key (on IBM compatible computers), command key (on Apple computers), Ctrl key, or Shift key in conjunction with another
key. The de facto standard for listing a shortcut is listing the modifier key, a plus symbol,
and another key. In other words, "ALT+S" is telling you to press
the Alt key and while continuing to hold the Alt key, press the S key
to perform the shortcut.
In addition to the shortcuts listed on this page, users can find the shortcut keys to their most popular program by looking for underlined
letters in their menus. For example, the picture to the right has an
underline on the "F" in File, which means you can press the Alt key and F
to access the File menu.
Note: Some programs
require the user
to press and hold Alt to see the underlined characters. Finally,
as can also be seen, some of the common features such as Open (Ctrl+O)
and Save (Ctrl+S) have shortcut keys assigned to them.
As you begin to memorize shortcut keys, you'll
notice that many applications share the same shortcut keys. We have the
most commonly shared shortcut keys in the below basic PC shortcut keys section.
Tip: Users outside the United States or users using a foreign copy of a
Microsoft Windows or Microsoft application may not be able to get all
the below shortcut keys to perform the function listed.
Basic PC shortcut keys
Below is a list of some of the most commonly used basic
shortcut keys that will work with almost all IBM compatible computers and
software programs. It is highly recommended that all users keep a good
reference of these shortcut keys or try to memorize them. Doing so will dramatically increase your productivity.
Shortcut Keys
Description
Alt + F
File menu options in current program.
Alt + E
Edit options in current program
Alt + Tab
Switch between open programs
F1
Universal Help in almost every Windows program.
F2
Rename a selected file
F5
Refresh the current program window
Ctrl + N
Create a new, blank document in some software programs
Highlights from current position to beginning of line.
Shift + End
Highlights from current position to end of line.
Ctrl + Left arrow
Moves one word to the left at a time.
Ctrl + Right arrow
Moves one word to the right at a time.
Ctrl + Esc
Opens the
START menu
Ctrl + Shift + Esc
Opens Windows Task Manager
Alt + F4
Close the currently active program
Alt + Enter
Open the Properties for the selected item (file, folder, shortcut, etc.)
PC shortcut keys for Special Characters
There are many special characters that can be created
using keyboard shortcuts. Below are some of the more common and popular
special characters and the keyboard shortcuts to create them.
Can’t wait till next year
to get Windows 10? You can be one of the first to experience the
exciting new features in Microsoft’s latest operating system by
installing the technical preview that’s already available for download
officially. Before going any further, you might want to see the new
features to expect by checking our previous article or simply watch this video featuring Joe Belfiore presenting the platform:
Things to Know Before Installing the Technical Preview
Microsoft issued some pretty big warnings and if you’re not really a technical person, you probably shouldn’t proceed with this. It’s
probably gonna be buggy and you’re advised not to install it on your
main computer. Here are things to consider before proceeding:
The
software is still in development mode and the main purpose of
downloading and using it is to test-run and share your feedback with
Microsoft.
You’re supposed to know what an ISO file is and
exactly how to use it. You’re expected to have installed Windows from an
ISO file before.
There will be lots of updates and drastic user
interface changes and you shouldn’t complain about it when Microsoft
decides to take away a certain you’ve already liked. Features will
constantly be added and removed with each update.
You’re expected to be a Windows power user.
Again, do not install this on a computer you use everyday unless you’re willing to take the risk.
Minimum System Requirements
If
you still want to go ahead and install the technical preview, be sure
your computer meets the minimum requirements highlighted below:
A minimum of 1GB RAM for 32-bit or 2GB for 64-bit
A free hard disk space of at least 16GB
1GHz Processor or faster.
A Microsoft account
A reliable internet access
Microsoft DirectX 9 graphics device with WDDM driver
Your Data and Settings
Depending
on which OS you’re upgrading from, you may lose your settings and data
or get to keep everything intact. If you’re upgrading to Windows 10 from
Windows 7, Windows 8 or Windows 8.1, you get to keep your settings,
data and most applications remain intact. Still, it’s advisable to
backup valuable data you don’t want to lose.
Unfortunately, this technical preview doesn’t run on any Windows RT system.
Also, if you’re still on Windows Vista, you can’t upgrade; you have to do a clean install.
Steps to Download and Install Windows 10 Technical Preview
1. Go ahead to Microsoft’s website and sign up for the Windows Insider Program. Be sure to also check the requirements and warnings before proceeding.
2. Depending on your system, download the 32-bit version or 64-bit version on the download page here. Be sure to keep the product key you’re given.
3. This is an ISO file, you may install burn it to a DVD or if you prefer installing from a flash drive, we have a tutorial on that here.
The article was written for Windows 7 but it works well with any
version of Windows, even Windows 10. Just remember to set first boot
device to USB device from BIOS settings.
4. You can double-click
setup.exe after burning the ISO file or reboot, making sure the bootable
device containing the Windows setup files boots first.
If you’ve installed Windows before, you should be able to follow through and complete the installation quite easily.
Is it worth it?
That’s
for you to decide. If you’re expecting a radical change like the one we
saw in Windows 8, you probably won’t find any. Microsoft is trying to
improve users experience and even went as far as going back on it’s
decision to remove the start button. A touch or Mac and Linux too is
seen in the OS but we think it’s really a nice one from Microsoft.
Hard drives are getting larger and larger, but somehow they always
seem to fill up. This is even more true if you’re using a solid-state
drive (SSD), which offers much less hard drive space than traditional
mechanical hard drives.
If you’re hurting for hard drive space, these tricks should help you
free up space for important files and programs by removing the
unimportant junk cluttering up your hard disk.
Image Credit: Jason Bache on Flickr
Run Disk Cleanup
Windows includes a built-in tool that deletes temporary files and
other unimportant data. To access it, right-click one of your hard
drives in the Computer window and select Properties.
Click the Disk Cleanup button in the disk properties window.
Select the types of files you want to delete and click OK. This
includes temporary files, log files, files in your recycle bin, and
other unimportant files.
You can also clean up system files, which don’t appear in the list here. Click the Clean up system files button if you also want to delete system files.
After you do, you can click the More Options button and use the Clean up
button under System Restore and Shadow Copies to delete system restore
data. This button deletes all but the most recent restore point, so
ensure your computer is working properly before using it – you won’t be
able to use older system restore points.
Uninstall Space-Hungry Applications
Uninstalling programs will free up space, but some programs use very
little space. From the Programs and Features control panel, you can
click the Size column to see just how much space each program installed
on your computer is using.
If you don’t see this column, click the options button at the top
right corner of the list and select the Details view. Note that this
isn’t always accurate – some programs don’t report the amount of space
they use. A program may be using a lot of space but may not have any
information in its Size column.
Analyze Disk Space
To find out exactly what is using space on your hard drive, you can
use a hard disk analysis program. These applications scan your hard
drive and display exactly which files and folders are taking up the most
space. We’ve covered the best 10 tools to analyze hard disk space, but if you want one to start with, try WinDirStat.
After scanning your system, WinDirStat shows you exactly which
folders, file types, and files are using the most space. Ensure you
don’t delete any important system files – only delete personal data
files. If you see a program’s folder in the Program Files folder using a
large amount of space, you can uninstall that program – WinDirStat can
tell you just how much space a program is using, even if the Programs
and Features Control Panel doesn’t.
Clean Temporary Files
Windows’ Disk Cleanup tool is useful, but it doesn’t delete temporary
files used by other programs. For example, it won’t clear Firefox or
Chrome browser caches, which can use gigabytes of hard disk space. (Your
browser cache uses hard disk space to save you time when accessing
websites in the future, but this is little comfort if you need the hard
disk space now.)
For more aggressive temporary and junk file cleaning, try CCleaner, which you can download here.
CCleaner cleans junk files from a variety of third-party programs and
also cleans up Windows files that Disk Cleanup won’t touch.
Find Duplicate Files
You can use a duplicate-file-finder application to scan your hard
drive for duplicate files, which are unnecessary and can be deleted.
We’ve covered using VisiPics to banish duplicate images. If you want a tool that also checks for other types of duplicate files, try dupeGuru
– the free version can only delete or move up to ten files at once, but
it will show you what duplicate files are cluttering up your hard
drive.
Reduce the Amount of Space Used for System Restore
If System Restore is eating up a lot of hard drive space for restore points, you can reduce the amount of hard disk space allocated to System Restore.
The trade-off is you’ll have less restore points to restore your system
from and less previous copies of files to restore. If these features
are less important to you than the hard disk space they use, go ahead
and free a few gigabytes by reducing the amount of space System Restore
uses.
Nuclear Options
These tricks will definitely save some space, but they’ll disable
important Windows features. We don’t recommend using any of them, but if
you desperately need disk space, they can help:
Disable Hibernation – When you hibernate your
system, it saves the contents of its RAM to your hard drive. This allows
it to save its system state without any power usage – the next time you
boot your computer, you’ll be back where you left of. Windows saves the
contents of your RAM in the C:\hiberfil.sys file. To save hard drive
space, you can disable hibernate entirely, which removes the file.
It seems like every day now that we see a new headline on a
cyber security breach. These headlines usually involve millions of
records being stolen from some large financial institution or retailer.
What doesn't reach the headlines are the many individual breaches that
happen millions of times a day, all over the world.
In previous articles, I've shown you how to create stronger passwords and how to prevent your home system from being compromised, but people are always asking me, "How can I tell if my system has already been hacked?"
The
answer to that question is not simple. Hacker software has become so
sophisticated that it is often hard to detect once it has become
embedded in your system. Although antivirus/anti-malware software
can often be effective in keeping your system from being infected, in
many cases, once it has become infected, the software can't detect or
remove the infection.
The reason for this is that the best malware
embeds itself in your system files and looks and acts like part of your
key Windows system files. Often, it will replace a system file with
itself, keeping the same file name and functionality, but adding its own
functionality. In this way, it looks and acts similarly to the
necessary system file that your operating system needs to function
properly, only the additional functionality gives a remote hacker access
to your system and system resources at their will.
Why Hackers Want the Use of Your Computer
Although
we are familiar with the idea that hackers might be seeking our credit
card numbers, bank accounts, and identity, some hackers are simply
seeking the use of your computer. By infecting thousands, even millions,
of computers around the world, they can create what is called a
"botnet."
A botnet is simply a network of compromised computers
controlled by a single command and control center. I estimate that 30 to
50% of all consumer-level computers are part of one botnet or another.
This
botnet can be used for many seemingly innocuous activities and many
more malicious ones. Botnets can be used to send spam, crack passwords,
conduct distributed denial of service (DDoS) attacks, etc. In all cases,
they are using system resources that are not available to you. You will
likely detect your own system running sluggishly or erratically.
Let's take a look at how we can detect if such a security breach has taken place on YOUR system.
Step 1: Run Antivirus Software
NOTE:
While antivirus and anti-malware software can differ in what they
detect, I'll be referring to both collectively as antivirus (or AV)
throughout this article. It's good to make sure you have one that
detects both viruses and malware including trojans, worms, spyware, rootkits, keyloggers, etc.
There
are many pieces of good antivirus software on the market. The problem
is that even the very best will not detect over 5 to 10% of all known
malware. Then, there is the unknown malware that comes
out every day. Hackers are always developing new software, usually
variants of existing malware, but different enough to evade the
signature detection of these software developers. In these cases, your
AV software is useless.
Despite this, I still recommend that you
buy a reputable brand of AV software and keep it up to date. Those
updates are critical as they represent the signatures of the new hacking
software that is found in the "wild." Enable this software to do
"active detection" and response, as once the malware has embedded itself
on your computer, it is sometimes impossible to detect and remove.
Although
it's hard for the average consumer to evaluate AV software and every
software developers claims to be the best, there is a objective
laboratory that does evaluate the effectiveness of AV software. It's
known as the Virus Bulletin and you can see its results here. The chart below is from their latest results evaluating numerous software. As you can see, AV software is NOT created equal.
In
the two systems I will use in this article, both had been through a
deep AV scan of the entire hard drive. In both cases, no malware or
viruses were detected, but I was still suspicious of infection.
Step 2: Check Task Manager
The first thing to
check when you suspect that you have been hacked is your Windows Task
Manager. You can access it by hitting Ctrl+Alt+Del on your keyboard and
selecting Task Manager at the bottom of the menu that pops up, or just
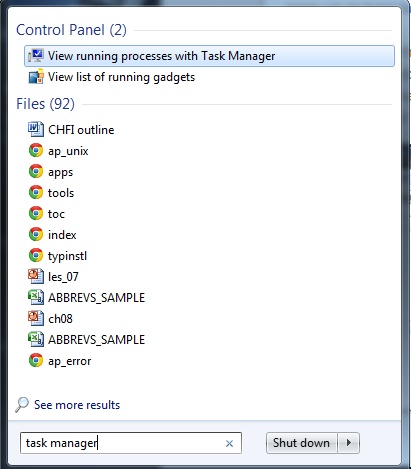
type Task Manager in the run line of your Start menu.
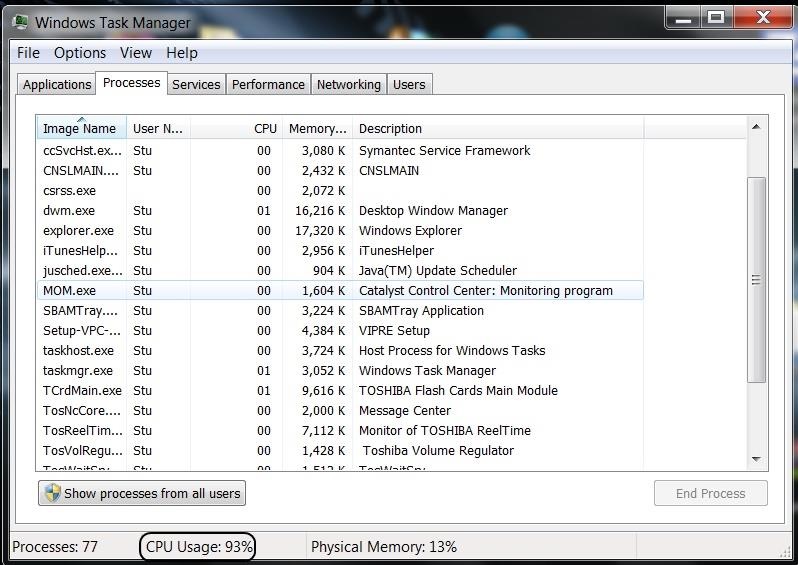
When
you open the Task Manager and click on the "Processes" tab, you should
get a window similar to the one below. Note at the bottom the CPU usage.
In this infected machine, the system is sitting idle and CPU usage is
spiking near 93%! Obviously, something is going on in this system.
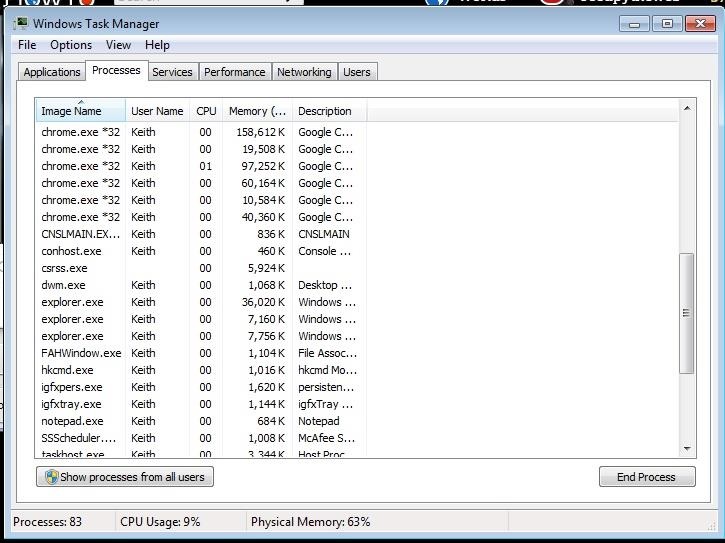
Below, you will see the same Task Manager on an uninfected system. With the system idle, CPU usage is under 10%.
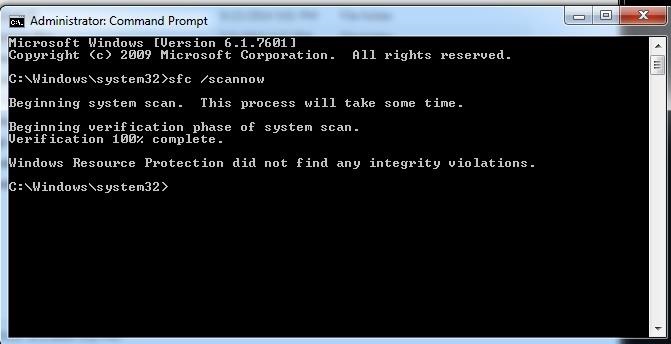
Step 3: Check System Integrity Checker in Windows
Now that we know something is awry on our system, let's delve a bit deeper to see if we can identify it.
Very
often, malware will embed itself into the system files which would
explain why the AV software couldn't detect or remove it. Microsoft
builds a system integrity checker into Windows called sfc.exe
that should be able to test the integrity of these system files. From
Microsoft's documentation, it describes this utility saying: "System
File Checker is a utility in Windows that allows users to scan for
corruptions in Windows system files and restore corrupted files."
The
idea here is that this tool or utility checks to see whether any
changes have been made to the system files and attempts to repair them.
Let's try it out. Open a command prompt by right-clicking and choose Run as Administrator. Then type the following command (make sure to press Enter afterward). sfc /scannow
As you can see from the above screenshot, the malware remains hidden even from this tool.
Step 4: Check Network Connections with Netstat
If
the malware on our system is to do us any harm, it needs to communicate
to the command and control center run by the hacker. Someone,
somewhere, must control it remotely to get it to do what they want and
then extract want they want.
Microsoft builds a utility into Windows called netstat.
Netstat is designed to identify all connections to your system. Let's
try using it to see whether any unusual connections exist.
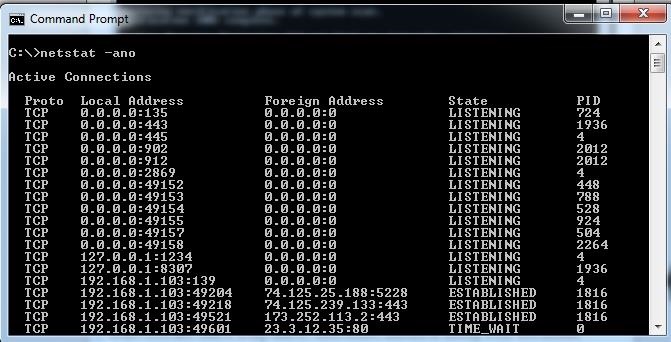
Once again, open a command prompt and use the following command. netstat -ano
Since
a piece of malware embedded into the system files can manipulate what
the operating system is actually telling us and thereby hide its
presence, this may explain why nothing unusual showed up in netstat.
This is one more indication of how recalcitrant some of this malicious
malware can be.
Step 5: Check Network Connections with WireShark
If
we can install a third-party software for analyzing the connections to
our computer, we may be able to identify the communication to and from
our computer by some malicious entity. The perfect piece of software for
this task is called Wireshark.
Wireshark
is a free, GUI-based tool that will display all the packets traveling
into and out of our computer. In this way, we might be able to identity
that pesky malware that is using up all our CPU cycles and making our
system so sluggish.
Since Wireshark is an application and not part
of the Windows system, it is less likely to be controlled and
manipulated by the malware. You can download Wireshark here. Once it has been installed, click on you active interface and you should see a screen open like that below.
Wireshark then can capture all the packets traveling to and from your system for later analysis.
The
key here is to look for anomalous packets that are not part of your
"normal" communication. Of course, it goes without saying that you first
should have an idea of what is "normal."
If you haven't looked at
your normal communication, you can then filter packets to only look at a
subset of all your communication. As attackers often use high number
ports to evade detection, you can filter for, say ports 1500-60000. If
you have malicious communication taking place, it will likely appear in
that port range. Furthermore, let's just look for traffic leaving our system to see whether the malware is "phoning home" on one of those ports.
We
can create a filter in Wireshark by typing it into the Filter window
beneath the main menu and icons. Filters in Wireshark are a separate
discipline entirely and beyond the scope of this article, but I will
walk you through a simple one for this purpose here.
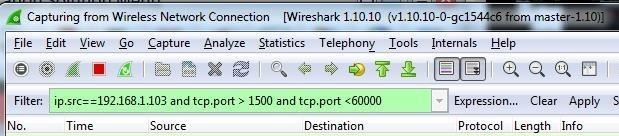
In this case here, my IP address is 192.168.1.103, so I type: ip.src ==192.168.1.103
This
filter will only show me traffic FROM my system (ip.src). Since I also
want to filter for ports above 1500 and below 60000, I can add: and tcp.port > 1500 and tcp.port < 60000
The resulting filter will only show me traffic that meets all of these conditions, namely, it should be:
Coming from my IP address (ip.src == 192.168.1.103)
Coming from one of my TCP ports above 1500 (tcp.port > 1500)
Coming from one of my TCP ports below 60000 (tcp.port < 60000)
When
I type all of this into the filter window, it turns from pink to green
indicating my syntax is correct like in the screenshot below.
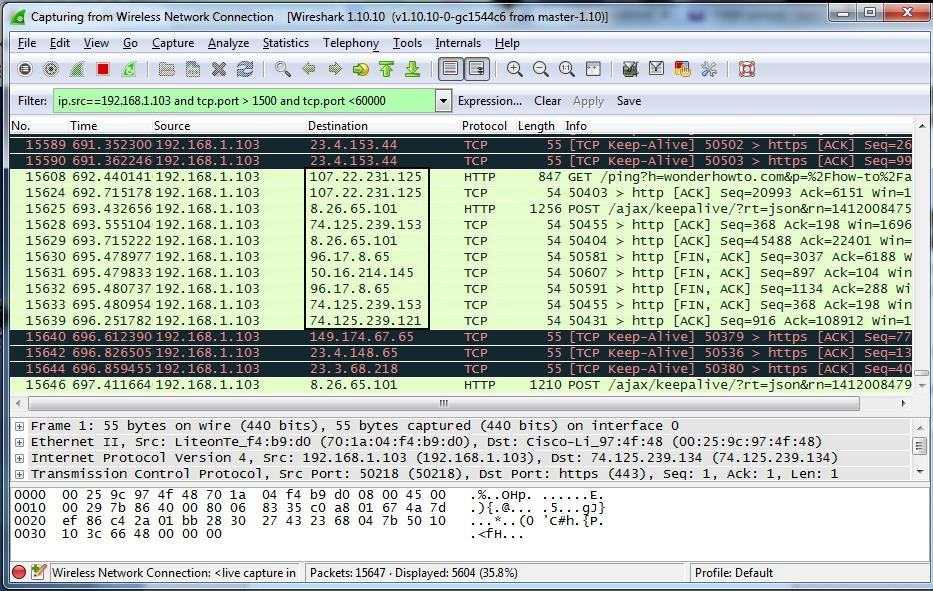
Now click on the Apply
button to the right of the filter window to apply this filter to all
traffic. When you do so, you will begin to filter for only the traffic
that meets these conditions.
Now
the key is to look for unusual traffic here that is not associated with
"normal" traffic from your system. This can be challenging. To identify
the malicious traffic, you will need to type the unknown IP addresses
that your machine is communicating with (see the IP addresses in the
box) into your browser and check to see whether it is a legitimate
website. If not, that traffic should be immediately viewed with some
skepticism.
Detecting whether your computer is infected with
malware is not necessarily a simple task. Of course, for most, simply
relying on antivirus software is the best and simplest technique. Given
that this software is imperfect, some of the techniques outlined here
may be effective in determining whether you have really been hacked or
not.


 The overall speed or
 There
are several contributing parts of a hard disk drive that can make it
faster, which makes your overall computer faster. With an old or slow
hard disk drive each time your computer has to read or write to the hard
disk drive the system will slow down. Below is a list of different
factors
There
are several contributing parts of a hard disk drive that can make it
faster, which makes your overall computer faster. With an old or slow
hard disk drive each time your computer has to read or write to the hard
disk drive the system will slow down. Below is a list of different
factors In addition to the shortcuts listed on this page, users can find the shortcut keys to their most popular program by looking for